12/5/2025
7 min read
Decor Haven
DIY Projects
Obsessed with Upcycled Glass Jar Storage
Discover why upcycled glass jars are a game-changer for kitchen organization, blending vintage charm with modern efficiency for clutter-free countertops through creative DIY ideas.

Have you ever stared at your cluttered kitchen countertop, wishing for a simple, stylish solution that doesn't break the bank? That's where upcycled glass jars come in, transforming everyday waste into functional treasures. We're diving deep into this obsession, exploring how these humble containers can revolutionize your space with a perfect mix of nostalgia and practicality.
What Makes Upcycled Glass Jars So Irresistible for Kitchen Storage?
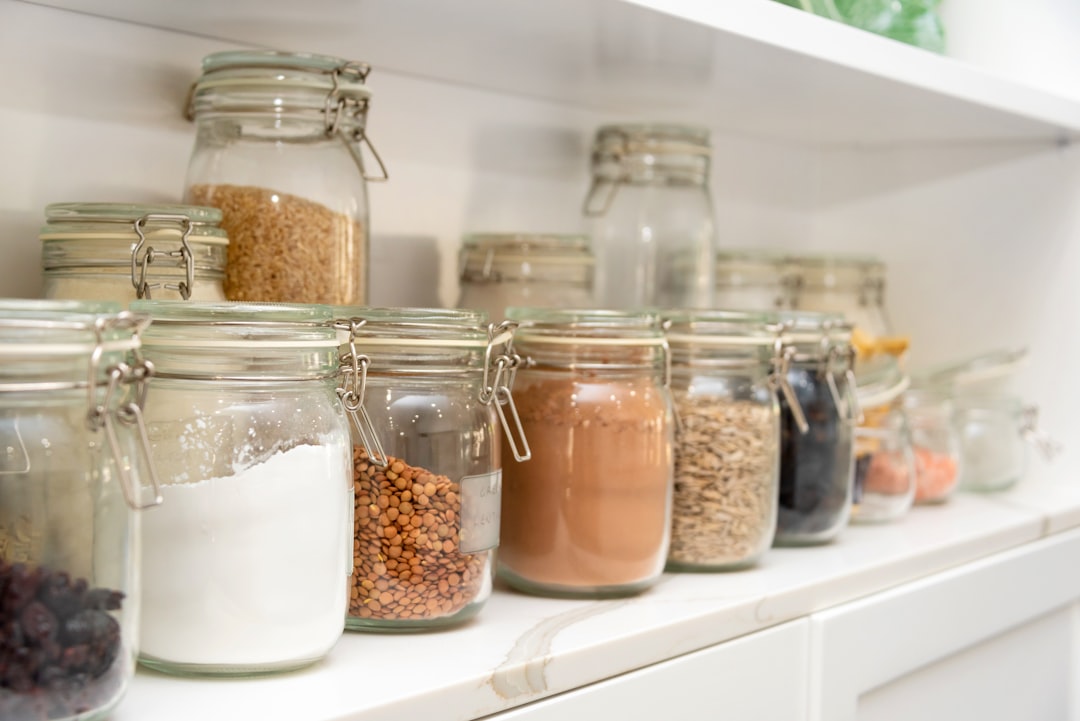
Upcycled glass jars captivate because they offer an eco-friendly, budget-savvy way to organize while adding a touch of vintage elegance to modern kitchens. Think about it: in a world drowning in single-use plastics, repurposing jars from pasta sauces, jams, or pickles reduces waste and infuses your home with character. We've seen homeowners in bustling cities like Seattle or cozy suburbs in the Midwest turn to these jars not just for storage, but as a statement of sustainable living. Their transparency allows you to see contents at a glance, preventing the all-too-common pantry mystery of 'what's in that opaque container?' Plus, with sizes ranging from 4-ounce jelly jars to 32-ounce mason jars, they adapt to any need—storing spices, grains, or even utensils.
The appeal deepens when you consider the aesthetic blend. Vintage vibes come from the imperfect shapes and labels of yesteryear, while modern organization shines through customizable labels and modular stacking. Remember that time your spice rack overflowed, sending cumin cascading everywhere? Upcycled jars prevent such chaos, keeping everything visible and accessible. And let's not forget the cost: often free or under $1 per jar if sourced from thrift stores, compared to $20+ for specialized organizers.
Unpacking the Benefits: Why Choose This Approach?
The answer lies in sustainability and versatility. Upcycled glass jars reduce landfill contributions—did you know Americans discard over 2.5 million tons of glass annually? By reusing, you're part of the solution. They also promote better organization; studies show visible storage cuts down on food waste by 20%, as you're less likely to forget about that half-bag of quinoa. In our experiences helping families revamp kitchens, these jars have turned chaotic counters into serene spaces, blending seamlessly with trends like farmhouse chic or minimalist designs. For instance, pairing them with wooden lids adds warmth, evoking a cozy cabin feel even in a high-rise apartment.
Moreover, they're incredibly durable. Glass withstands temperatures from freezer to dishwasher, unlike plastic that warps or stains. We love how they encourage creativity—paint the lids for a pop of color or etch designs for personalization. It's not just storage; it's a canvas for expression.
Real-Life Examples of Upcycled Jar Transformations
Take Sarah's kitchen in Portland, where she upcycled 16-ounce salsa jars into a spice station. She removed labels, added chalkboard paint to the lids (using 2 coats of 4x6-inch applications), and organized alphabetically for easy access. Before, her spices cluttered a drawer; after, they lined a shelf, saving 15 inches of counter space.
Another standout is Mike's eco-friendly setup in Austin. He used varying sizes—8-ounce for herbs, 24-ounce for pasta—to create a modular pantry wall. By mounting them on a 36x24-inch wooden board with metal clamps (each clamp measuring 2 inches in diameter), he achieved a vintage apothecary look that doubles as decor. The result? A 30% reduction in clutter, with everything from lentils to baking soda neatly displayed.
Or consider the family in Chicago who turned pickle jars into utensil holders. They drilled 1/4-inch holes in lids for drainage, painted them matte black, and grouped them on a lazy Susan (12-inch diameter). This not only organized forks and spoons but added a modern twist to their vintage-inspired kitchen.
- Spice Drawer Alternative: Use 4-ounce jars for individual spices, labeling with vinyl stickers (0.5x2-inch size).
- Bulk Bin Hack: 64-ounce jars for flours, sealed with silicone gaskets for freshness.
- Herb Garden Indoors: Small jars with 2-inch net pots for growing basil on windowsills.
Step-by-Step Guide: Crafting Your Own Upcycled Jar Storage
Ready to get hands-on? Let's break it down with precise measurements and materials for a foolproof project.
First, gather supplies: Collect clean glass jars (aim for 10-15 in sizes from 8 to 32 ounces), soap for washing, labels (waterproof, 2x3-inch), paint (chalkboard or acrylic, 4-ounce bottles), brushes (1-inch wide), and optional lids (metal or bamboo, matching jar threads of 2.5-3 inches).
Step 1: Clean thoroughly. Soak jars in hot soapy water for 30 minutes, then scrub with a sponge to remove residues. For stubborn labels, apply a mixture of 1 part baking soda and 1 part oil, let sit for 15 minutes, and peel off. Rinse and dry completely to avoid streaks.
Step 2: Customize lids. If using chalkboard paint, apply two thin coats (each 1/16-inch thick) with a foam brush, drying 1 hour between coats. For a vintage feel, distress edges with sandpaper (220-grit).
Step 3: Label creatively. Cut vinyl to 1.5x2.5 inches, adhere to jar fronts. Use a permanent marker for writing—opt for fine-tip (0.5mm) for precision.
Step 4: Organize by category. Fill jars: 16-ounce for grains (like 2 cups of rice), 4-ounce for spices (1/4 cup each). Stack on shelves with 12-inch spacing between rows for accessibility.
Step 5: Display. Arrange on countertops with a 6-inch buffer zone to prevent tipping. For wall mounting, use 1-inch screws and brackets spaced 4 inches apart.
This process takes about 2 hours and costs under $10, yielding a custom system that's both functional and fabulous.
Transitioning smoothly, while the how-to is straightforward, hiccups can happen. That's where troubleshooting comes in.
Common Pitfalls and How to Fix Them
Ever had a jar lid rust after a few weeks? It's a frequent issue in humid climates like the Southeast. Solution: Opt for stainless steel lids (2.8-inch diameter) or coat metal ones with clear sealant (apply 1 thin layer, dry for 24 hours). Another snag: jars tipping over on uneven counters. Counter this by adding rubber feet (0.5-inch diameter) to bases, ensuring stability.
Label peeling? Use outdoor-grade adhesive for longevity, especially in steamy kitchens. If contents clump due to moisture, insert silica packets (1x2-inch size) inside jars. Warning: Avoid overloading—limit to 80% capacity to prevent breakage. We've heard tales of overzealous filling leading to cracks; measure contents precisely, like 1.5 cups max for a 16-ounce jar.
For odor retention from original contents, soak in vinegar solution (1:1 ratio, 1 hour) before use. These tips stem from real homeowner trials, turning potential disasters into smooth successes.
Where to Go From Here: Expanding Your Upcycled Empire
With your jars in place, consider scaling up. Integrate them into a full pantry overhaul, perhaps linking to our guide on sustainable shelving. Next, experiment with seasonal twists—like filling jars with holiday spices for winter baking.
Or venture into bathroom storage, using similar techniques for cotton balls in 8-ounce jars. The possibilities are endless, fostering a home that's organized, eco-conscious, and uniquely yours. We encourage you to start small; one jar at a time builds momentum. Reflect on this: in repurposing, you're not just decluttering—you're crafting a legacy of mindful living. What's your first jar project going to be?
As you embark on this journey, remember the joy in the process. Upcycling isn't just practical; it's a creative outlet that brings families together over weekend projects. We've shared detailed insights, from measurements like 2-inch clamps to materials like 220-grit sandpaper, to ensure your success. If challenges arise, revisit the troubleshooting section—it's designed for real-world application. Looking ahead, why not explore complementary ideas, such as wooden crate organizers? Your kitchen awaits its transformation, blending those vintage vibes with modern flair seamlessly.
Shop The Look
Get the items featured in this post and bring the style home.


Back to Blog
Next Post
Coming Soon →